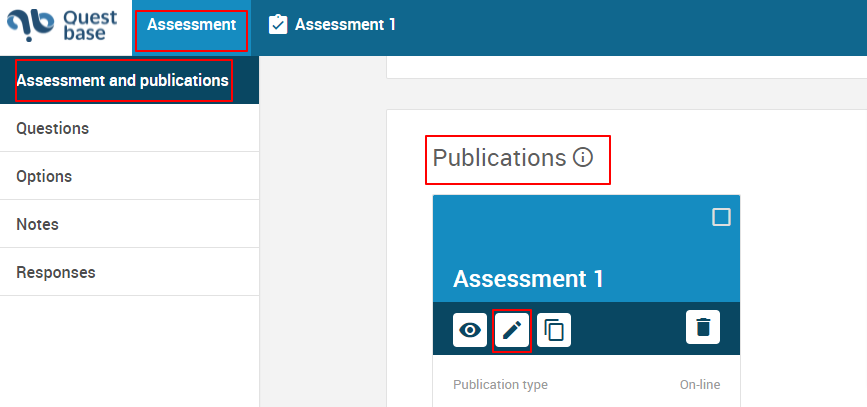
To modify the option of an online publication, previously created, follow these steps:
- Click on Assessment, in the main menu, on the top
- Click on the title of the assessment that you want to modify
- Click on the left side menu on Assessment and publications, go down, where you will find the Publication window. Click on the button
 in the box of the online publication you want to modify
 - From the left side menu, click on Options, where you can modify:
– Configuration options
– Protection options
– IP addresses options
– History options
– Call back options
– E-mail options
– Message options

- Click on Save and close
How to modify the configuration options of an online publication #
To modify the configuration options of an online publication, previously created, follow these steps:
- Click on Assessment, in the main menu, on the top
- Click on the title of the assessment that you want to modify
- Click on the left side menu on Assessment and publications, go down, where you will find the Publication window. Click on the button in the box of the online publication you want to modify
- From the left side menu, click on Options, you can manage:
How to set a max time of an online publication #
- In the Option window, in Configuration, enter the check mark in correspondence to the written Set max time (mm:ss)

How to set the function stop and resume the assessment of an online publication #
- In the Option window, in Configuration, enter the check mark in correspondence to the written Allow to stop and resume the assessment
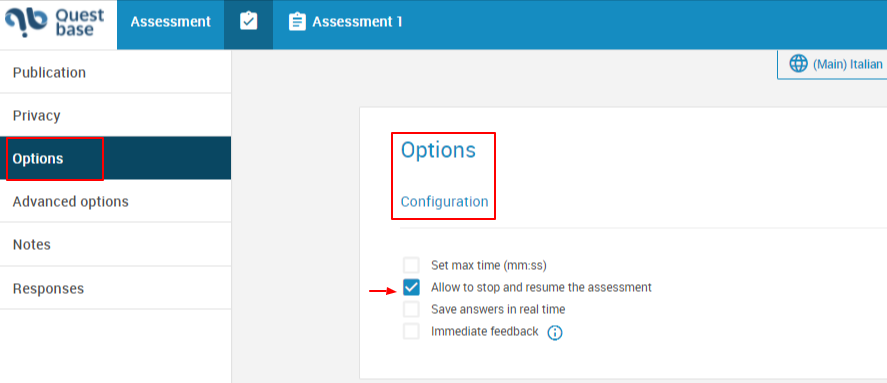
*Remember that this configuration option is available only for user with a Gold account
How to set the function save answer in real time of an online publication #
- In the Option window, in Configuration, enter the check mark in correspondence to the written Save answer in real time

*Remember that this configuration option is available only for user with a Gold account
How to have immediate feedback of an online publication #
In the Option window, in Configuration, enter the check mark in correspondence to the written Immediate feedback and also choose how to visualize it (Never; Always; Only for wrong answers)

How to set questions sequence for an online publication #
- In the Option window, in Configuration, on the right side, you find Set question sequence for this publication, then click on the drop-down menu and choose to set:
o Show all questions in a single page
o Show X questions per page
o Show one goals per page

How to set the function show the back button #
From the drop-down menu, if you decide to set the option Show X questions per page, under the number of questions that you want to visualize per page, enter the check mark in correspondence to the written Show back button

- Click on Save and close
How to modify the protection options of an online publication #
To modify the protection options of an online publication, previously created, follow these steps:
- Click on Assessment, in the main menu, on the top and then click on the title of the assessment you want to modify
- In the left side menu, click on Assessment and publications, go down, where you will find the Publication window. Click on the button in the box of the online publication you want to modify
- From the left side menu, click on Options, where you can set:
How to make an online publication available from #
- In the Option window, go down in Protection, enter the check mark in correspondence to the written This publication is only available from
- Click on the button
 , the calendar, to select the date from which the online publication will be available
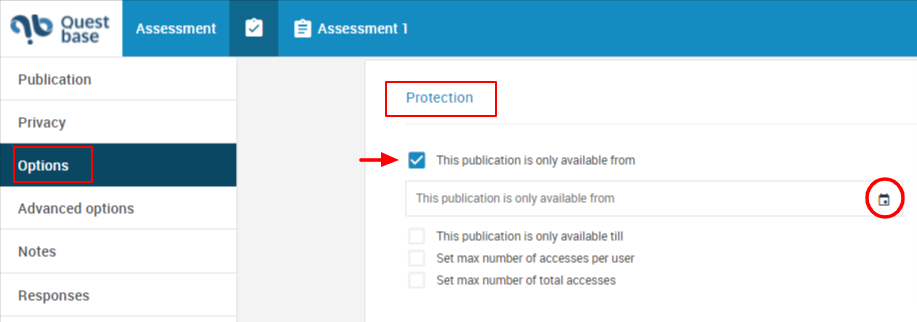
- Click on Save and close
How to make an online publication available till #
- In the Option window, go down in Protection, enter the check mark in correspondence to the written This publication is only available till
- Click on the button , the calendar, to select the date until which the online publication will be available

- Click on Save and close
How to set max number per user #
- In the Option window, go down in Protection, enter the check mark in correspondence to the written Set max number of accesses per user
- Click on the drop-down menu to set the max number of accesses per user
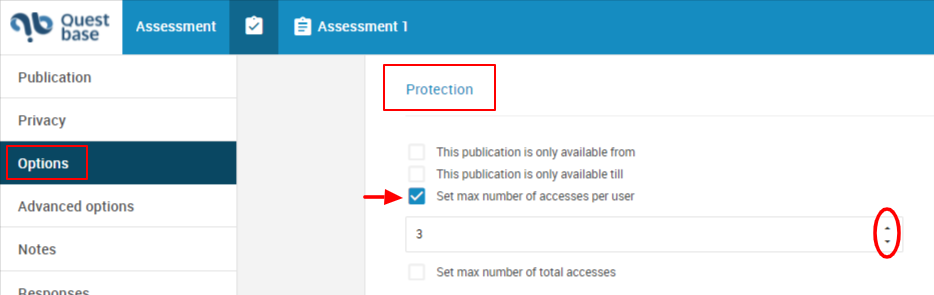
- Click on Save and close
How to set max number of total access #
- In the option window, go down in Protection, enter the check mark in correspondence to the written Set max number of total accesses
- Click on the drop-down menu to set the max number of total accesses

- Click on Save and close
How to limit the access of an online publication by the IP address #
To limit the access of an online publication, previously created, by the IP address, follow these steps:
- Click on Assessment, in the main menu, on the top and then, click on the assessment title who want to modify
- In the left side menu, click on Assessment and publications, go down, where you will find the Publication window. Click on the button in the box of the online publication you want to modify
- From the left side menu, click on Options, where you can set:
How to access an online publication from any IP address #
- In the Option window, go down in IP addresses, enter the check mark in correspondence to the written This publication can be accessed from any IP addresses
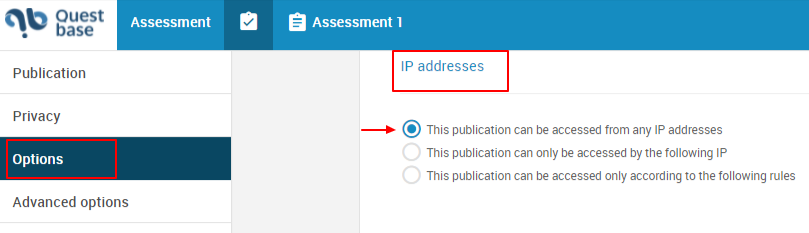
- Click on Save and close
How to access an online publication only by the following IP address #
- In the Option window, go down in IP addresses, enter the check mark in correspondence to the written This publication can only be accessed by the following IP and then, complete by entering in the empty box the IP address
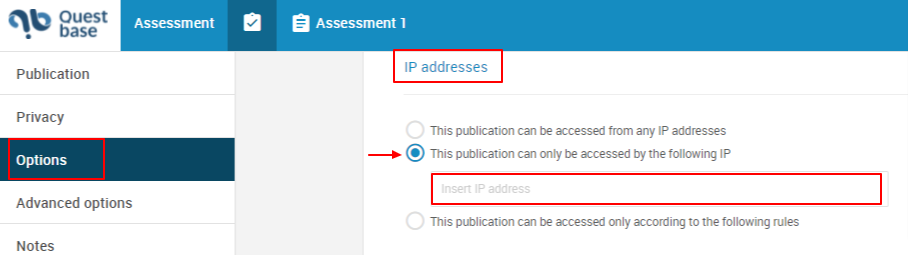
- Click on Save and close
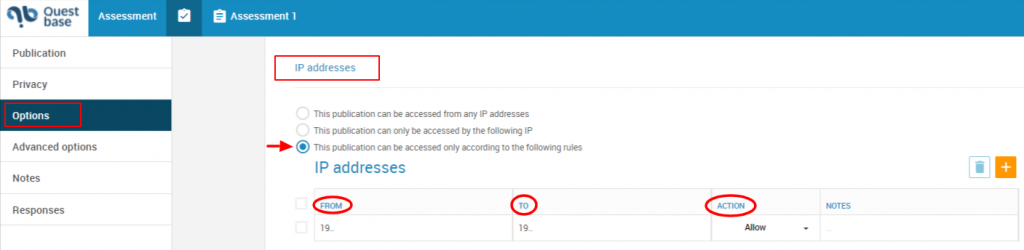
How to access an online publication only according to the following rules #
- In the Option window, go down in IP addresses, enter the check mark in correspondence to the written can be accesses only according to the following rules
• Click on the button  to set a range of the IP addresses (from/to), you can set action, permission or limitations to the IP addresses and add notes for each of them
How to modify the history options of the report of an online publication #
To modify the history options of an online publication, previously created, follow these steps:
- Click on Assessment, in the main menu, on the top and then, click on the assessment title who want to modify
- In the left side menu, click on Assessment and publications, go down, where you will find the Publication window. Click on the button in the box of the online publication you want to modify
- From the left side menu, click on Options, go down in History, enter the check mark in correspondence to the available choices to set the history of the responses’ reports
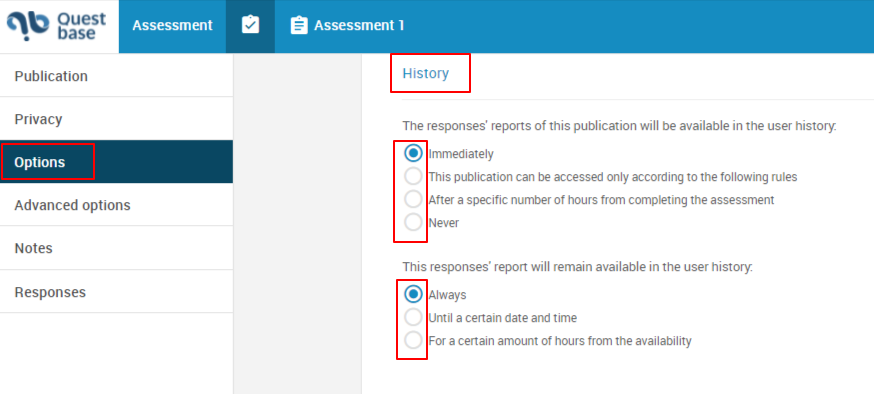
- Click on Save and close
How to modify the callback options of an online publication #
To modify the callback options of an online publications, previously created, follow these steps:
- Click on Assessment, in the main menu, on the top and then, click on the assessment title who want to modify
- In the left side menu, click on Assessment and publications, go down, where you will find the Publication window. Click on the button in the box of the online publication you want to modify
- From the left side menu, click on Options, go down in Callback, enter the check mark in correspondence to the available choices

- Click on Save and close
How to set the confirmation and notification e-mails #
What is the confirm e-mail #
The confirmation e-mail is sent to users as soon as they finish taking the assessment. It is normally used to confirm the take and, if necessary, communicate the score obtained.
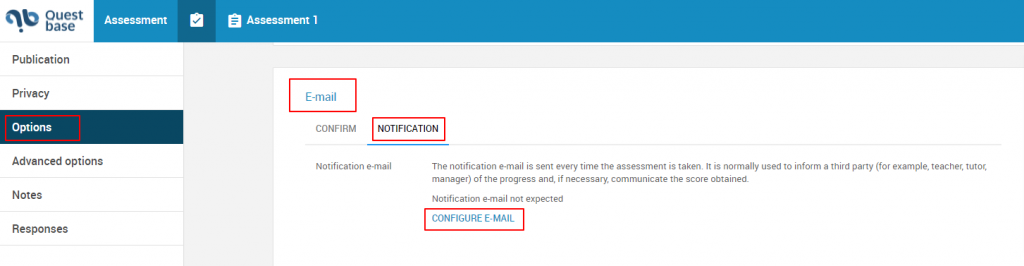
What is the notification e-mail #
The notification e-mail is sent every time the assessment is taken. It is normally used to inform a third party (for example, teacher, tutor, manager) of the progress and, if necessary, communicate the score obtained.
To modify the confirmation and notification e-mails of an online publication, previouslt created, follow these steps:
- Click on Assessment, in the main menu, on the top and then, click on the assessment title who want to modify
- In the left side menu, click on Assessment and publications, go down, where you will find the Publication window. Click on the button in the box of the online publication you want to modify
- From the left side menu, click on Options, go down in E-mail.
You can set a confirmation e-mail to send to users as soon as they finish taking the assessment, then click on Configure e-mail.

In the Confirmation e-mail window you can:
- Enter the check mark in correspondence to the written Confirmation e-mail sending enabled
- In correspondence to the recipient, from the drop-down menu, fill the personal field, if it is not already created, click on Create personal field
- Enter e-mail addresses in CC (Carbon Copy) or in BCC (Blind Carbon Copy, the e-mail addresses of the recipients specified in this field do not appear in the received message header and recipients included in the To or CC fields, will not know that a copy of the message is sent to these addresses)
- Enter the e-mail Subject
- Enter a message (Simple Text; Advanced Text, HTML) and enter dynamics fields (from the drop-down menu choose between Name, Surname, Full name, Score (points/percentage), Date and Time, ..)
*Remember that the dynamics fields will be filled by QuestBase automatically - Enter the check mark in correspondence to the written Attach certificate if available
- Delete the confirmation e-mail

- Click on Save and close
Furthermore, you can set the notification e-mail, that is sent every time the assessment is taken, then, click on Configure e-mail.
In the Notification e-mail window you can:
- Enter the check mark in correspondence to the written Notification e-mail sending enabled
- In correspondence to the recipient, enter the recipients divided by the punctuation character “,”(comma)
- Enter e-mail addresses in CC (Carbon Copy) or in BCC (Blind Carbon Copy, the e-mail addresses of the recipients specified in this field do not appear in the received message header and recipients included in the To or CC fields, will not know that a copy of the message is sent to these addresses)
- Enter the e-mail Subject
- Enter a message (Simple Text; Advanced Text, HTML) and enter dynamics fields (from the drop-down menu choose between Name, Surname, Full name, Score (points/percentage), Date and Time, ..)
*Remember that the dynamics fields will be filled by QuestBase automatically
- Enter the check mark in correspondence to the written Attach certificate if available
- Delete the notification e-mail
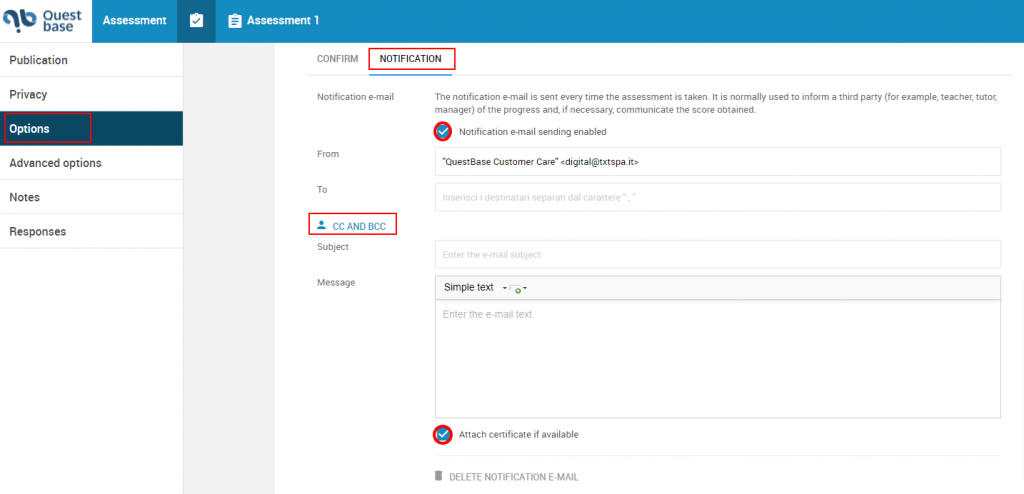
- Click on Save and close
How to automatically send the certificate for passing the assessment #
To automatically send the certificate for passing the assessment towards the confirmation or the notification email, follow these steps:
- Click on Assessment, in the main menu, on the top and then, click on the assessment title who want to modify
- In the left side menu, click on Assessment and publications, go down, where you will find the Publication window. Click on the button in the box of the online publication you want to modify
- From the left side menu, click on Options, go down in E-mail.
- In both E-mail windows, of confirmation or notification, go down, under the message that you can enter in the e-mail, enter the check mark in correspondence to the written Attach certificate if available

How to set a message at the beginning or at the end of the assessment #
To set a message at the beginning or at the end of the assessment, follow these steps:
- Click on Assessment, in the main menu, on the top and then, click on the assessment title who want to modify
- In the left side menu, click on Assessment and publications, go down, where you will find the Publication window. Click on the button in the box of the online publication you want to modify
- From the left side menu, click on Options, go down in Message at the beginning or at the end of the assessment
- Click on the button
 and then, write the text (Simple text, Advanced text, HTML)

- Click on Save and close
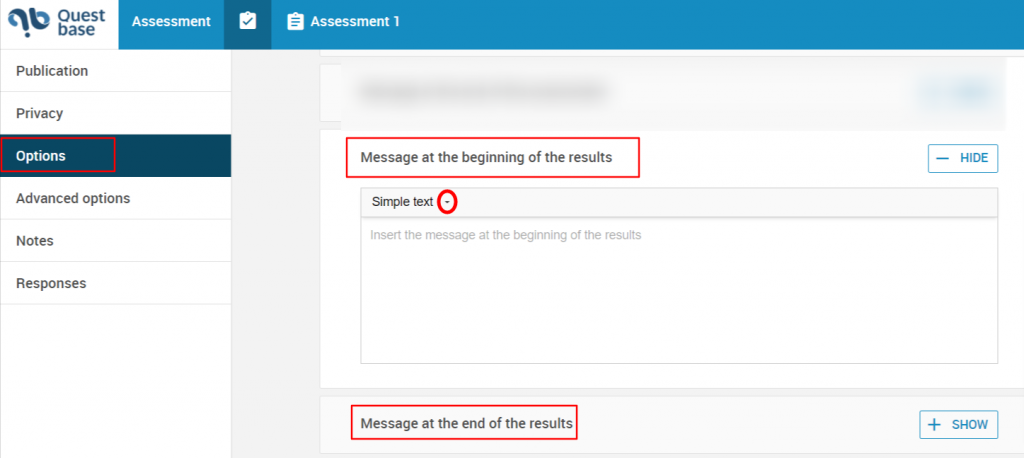
How to set a message at the beginning or at the end of the results #
To set a message at the beginning or at the end of the results, follow these steps:
- Click on Assessment, in the main menu, on the top and then, click on the assessment title who want to modify
- In the left side menu, click on Assessment and publications, go down, where you will find the Publication window. Click on the button in the box of the online publication you want to modify
• From the left side menu, click on Options, go down in Message at the beginning or at the end of the results
• Click on the button ![]() and then, write the text (Simple text, Advanced text, HTML)
and then, write the text (Simple text, Advanced text, HTML)
• Click on Save and close