To modify the advanced options of an online publication, previously created, follow these steps:
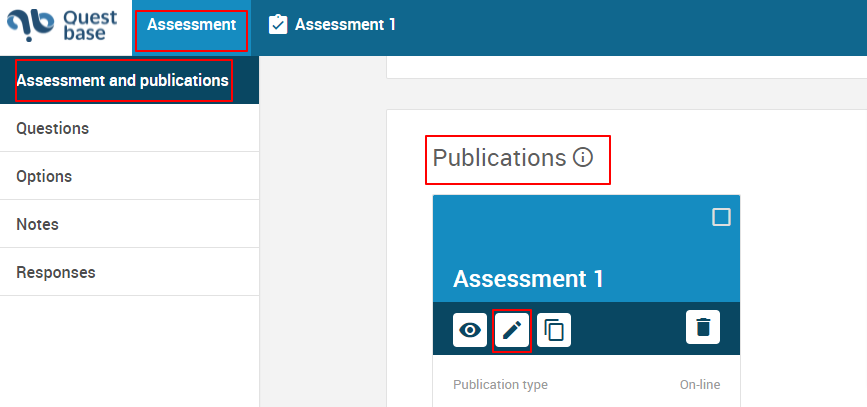
- Click on Assessment, in the main menu, on the top and then, click on the assessment title who want to modify
- In the left side menu, click on Assessment and publications, go down, where you will find the Publication window. Click on the button
 in the box of the online publication you want to modify
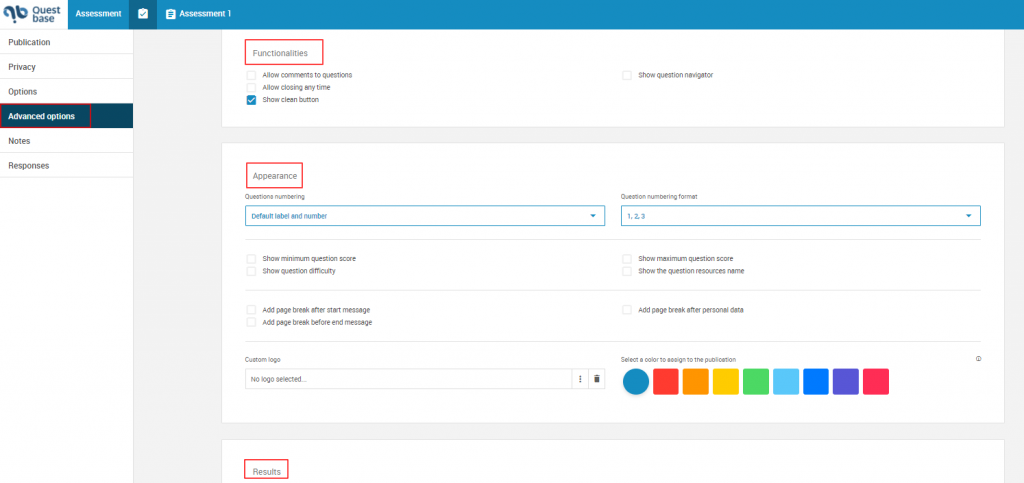
• From the left side menu, click on Advanced options, you can manage:
- Functionalities
- Appearance
- Results
• Click on Save and close
How to manage the functionalities of an online publication #
To modify the advanced options of an online publication, previously created, follow these steps:
- Click on Assessment, in the main menu, on the top and then, click on the assessment title who want to modify
- In the left side menu, click on Assessment and publications, go down, where you will find the Publication window. Click on the button
 in the box of the online publication you want to modify

- From the left side menu, click on Advanced options, you can set:
How to allow comments to the questions #
- In the Functionalities window, enter the check mark in correspondence to the written Allow comments to questions

How to allow closing any time #
- In the Functionalities window, enter the check mark in correspondence to the written Allow closing any time

How to show the clean button #
- In the Functionalities window, enter the check mark in correspondence to the written Show the clean button

How to show the question navigator #
- In the Functionalities window, enter the check mark in correspondence to the written Show question navigator. Under this written, you can enter the check mark in correspondence to the written Allow mark for review

Once the management of the Functionalities is over, click on Save and close.
How to manage the appearence options of an online publication #
To modify the appearance options of an online publication, previously created, follow these steps:
- Click on Assessment, in the main menu, on the top and then, click on the assessment title who want to modify
- In the left side menu, click on Assessment and publications, go down, where you will find the Publication window. Click on the button
 in the box of the online publication you want to modify

- From the left side menu, click on Advanced options, you can set:
How to set the numeration and the format of questions #
- In the Appearance window, click on the drop-down menus, how to set numeration of the questions (No; Number only; Default label and number; Question label) and their format (1,2,3; 01,02,03;a,b,c;..)

How to show the minimum and the maximum of questions’ score #
- In the Appearance window, enter the check marks in correspondence to the written Show minimum and the maximum of questions’ score or to the written Show maximum question score

How to show questions’ difficulty #
- In the Appearance window, enter the check marks in correspondence to the written Show question difficulty

How to show the question resources name #
- In the Appearance window, enter the check marks in correspondence to the written Show the question resources name

How to show the welcome page #

How to add a page break after the start message #
- In the Appearance window, enter the check marks in correspondence to the written Add a page break after the start message

*Remember that this function is available only if the check mark’s isn’t on the written Show the welcome page
How to add a page break before the start message #
- In the Appearance window, enter the check marks in correspondence to the written Add a page break before the start message

How to add a page break after personal data #
- In the Appearance window, enter the check marks in correspondence to the written Add a page break after personal data

*Remember that this function is available only if the check mark’s isn’t on the written Show the welcome page
How to set a customized logo #
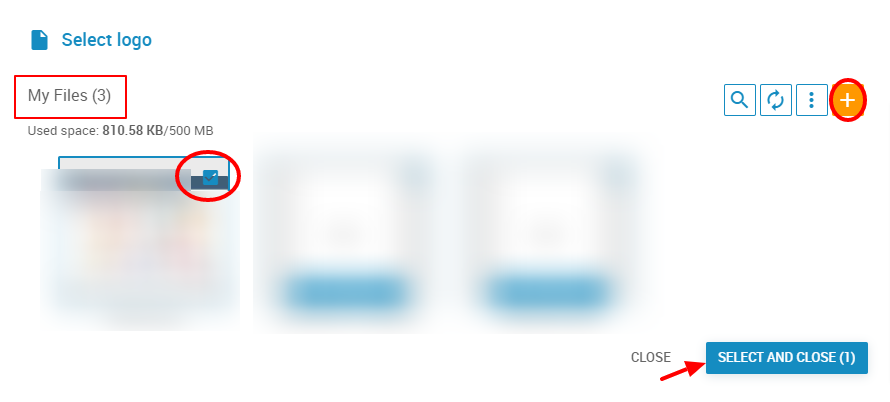
- In the Appearance window, in correspondence to the written Customized logo, click on the button
 and select your logo
- In the Select logo window, if the logo there is not already present in My files, click on the button
 to add it. Enter the check mark in correspondence of the logo who you want to upload. Click on Select and close
How to choose a colour for the online publication #
- In the Appearance window, in correspondence to the written Select a colour to assign to the publication, click on a colour between the available options
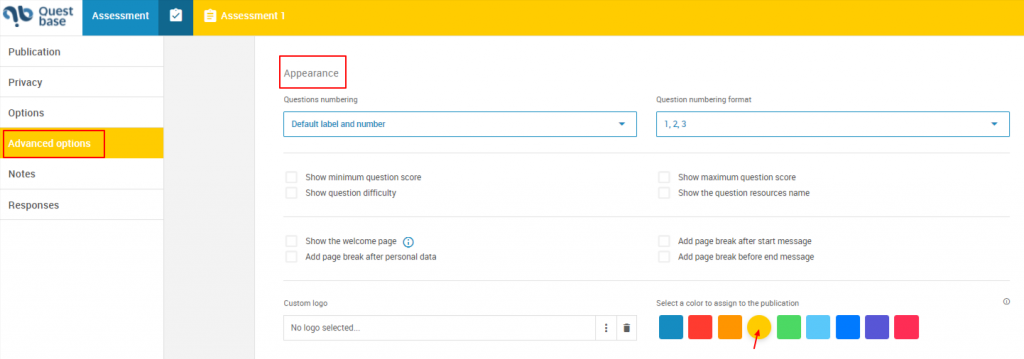
- Once the management of the Appearance is over, click on Save and close.
How to manage the results showing #
To manage the results showing of an online publication, previously created, follow these steps:
- Click on Assessment, in the main menu, on the top and then, click on the assessment title who want to modify
- In the left side menu, click on Assessment and publications, go down, where you will find the Publication window. Click on the button
 in the box of the online publication you want to modify

From the left side menu, click on Advanced options, go down until the Results window, where you can set what the recipients will visualize of the assessment. Enter the check mark in correspondence to the interest fields, which are:
- Date and time
- Results (passed/failed)
- Total score (percent)
- Answer chart
- Outcomes list
- View outcome result (points)
- IP address
- Total score (points)
- Answer statistics
- Time spent on
- Outcome result (percentage)

- Click on Save and close
How to manage the recipients’ detailed results showing #
To manage the recipients’ results showing of an online publication, previously created, follow these steps:
- Click on Assessment, in the main menu, on the top and then, click on the assessment title who want to modify
- In the left side menu, click on Assessment and publications, go down, where you will find the Publication window. Click on the button
 in the box of the online publication you want to modify

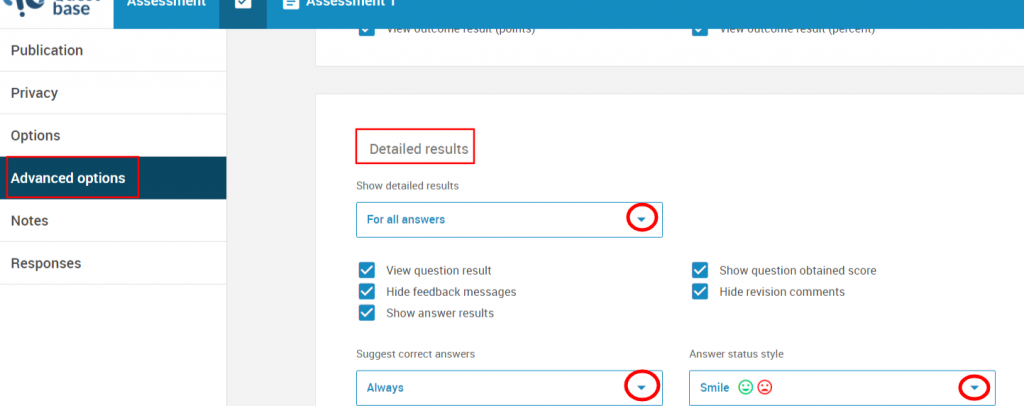
From the left side menu, click on Advanced options, go down until the Detailed results, where you can set what the recipients will visualize of the assessment. Enter the check mark in correspondence to the interest fields, which are:
- Show of the detailed results (you can choose between: No; For all answers, Only for wrong answers; Only for wrong and null answers)
- View of question result
- Hide feedback
- Show of the answer result
- Show question obtained score
- Hide revision comments
- Suggest correct answer (you can choose between: No; Always; Only if the assessment is passed)
- Answer status style (Smile; Thumb; Standard check; Circle check)
- Click on Save and close


